
EFS Administrator Help
As the Electronic Filing System (EFS) Administrator, you have additional capabilities, including the ability to manage the users for your membership. To learn more, click on a topic below.
If you have been appointed the EFS Administrator for the licensees in your SLAI membership, you have some special abilities on the EFS that you should know about. First, let’s acquaint you with the system.
Your Login and Password
- Log in using your company email address
- You’ll also need your SLAI Member Number. It should have been included in the subject line of the email you received when you were appointed as EFS Admin. If you can’t find it, contact us.
- Finally, you’ll need your password. If you don’t remember your password, or if you’ve never selected one, click the “Forgot password” link on the login page. Fill in the fields and click SUBMIT. You will receive an email with instructions and a reset link. The password-reset link in that email is specific to you and you cannot forward it to others. Also, it expires within a short time, so act quickly. If you request a password reset more than once, only the latest link sent to you will work.
Note that this login account information is for your use only. As the EFS Administrator, if you want others in your office to use the EFS, please add them as EFS Users in the system and provide them with the link to the EFS website. Each person using the EFS must have their own login tied to their company email address. Do not use generic emails or group inboxes for logins since this is a security risk.
Using the EFS
The button in the upper-right corner of our website can be used to access the EFS. You’ll probably want to bookmark the EFS site for future reference. You’ll also want to provide the URL to any other users you add.
The system is intuitive and easy to use. Click on “Help” in the upper-right corner of any page to see general help and information for that page. For information on specific fields, you can click on the lowercase letter “i” next to the field, which looks like this:

Administrator Management Tools
Each user on the EFS can change their own password when necessary by using the Edit Profile option from their profile menu (located by their name in the upper-right corner of the EFS screen), or by clicking on the “Forgot Password” link on the login page. As the EFS Administrator, however, you can manage all information for all users. You can also print tax statements, reports and invoices. Permission to print reports and tax statements can be granted to individual users, as well.
You also have access to tools that affect all users on your account. They are located in a special section along the left side of the screen titled Manage Account . Available tools include:
OTHER SETTINGS You can set the password expiration period and session timeout for all users in your account. You can also enable and disable the Auto-Pay feature for stamping fees.
YOUR INSURANCE COS If your firm only uses a certain number of surplus line insurers, you can set up a custom, limited set of insurers that can be chosen in the insurer drop-down list when entering policies and endorsements. This makes data-entry easier and reduces the likelihood of errors.
YOUR COV CODES If your firm only writes certain coverages, you can set up a custom, limited set of coverages that can be chosen in the drop-down list used by users performing data-entry. This makes data-entry easier and reduces the likelihood of errors.
YOUR EFILE USERS As EFS Administrator, you can add, delete and lock out users. You can grant and revoke certain permissions, including who can enter filings and who can reprint stamping fee invoices and tax statements.
YOUR USER FIELDS You can set up custom messages that will print on each filing confirmation page.
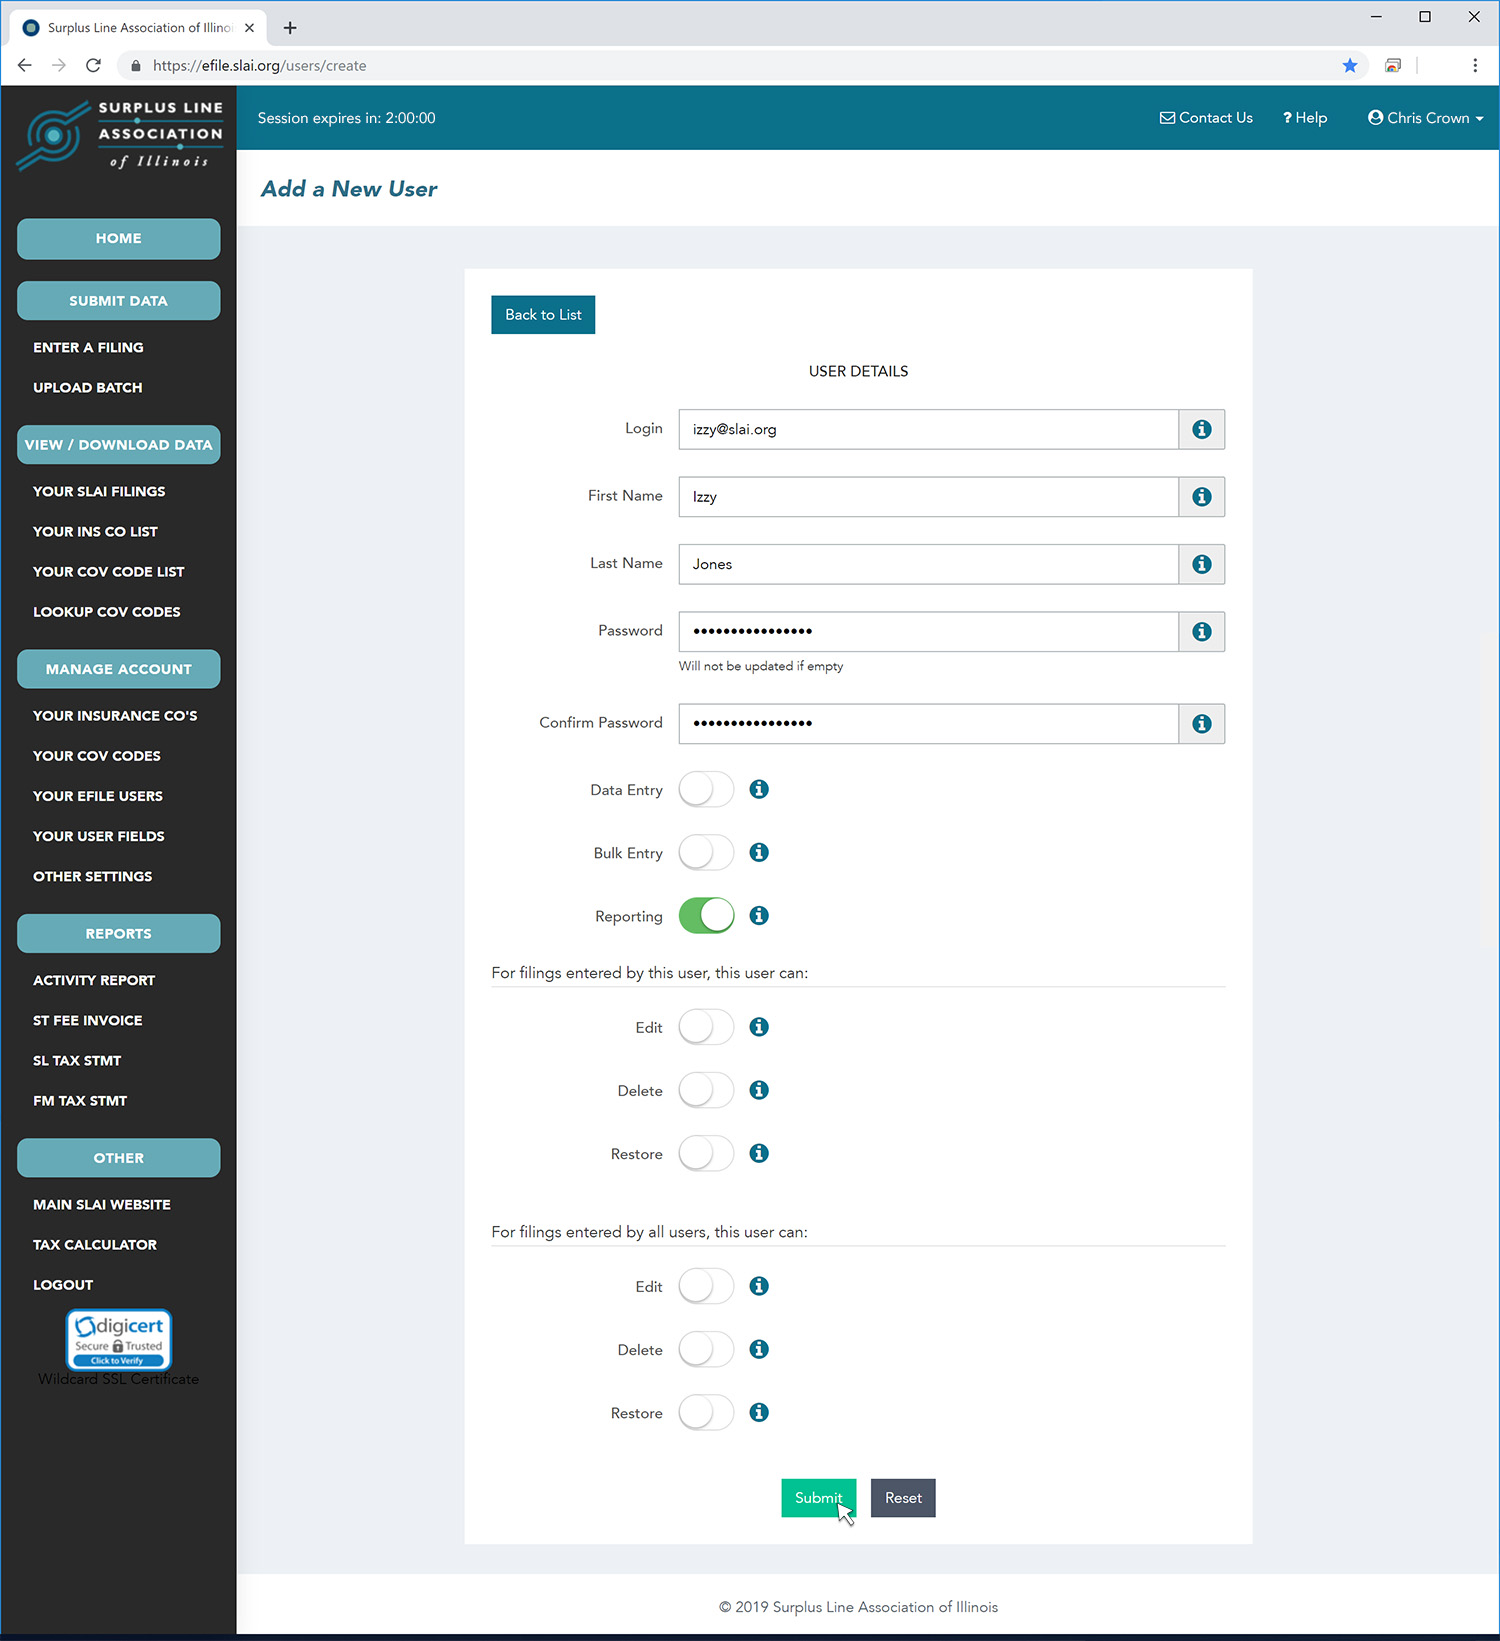
Adding a user on the EFS is easy. On the Your eFile Users screen, click the Add New Record button in the upper left portion of the screen.
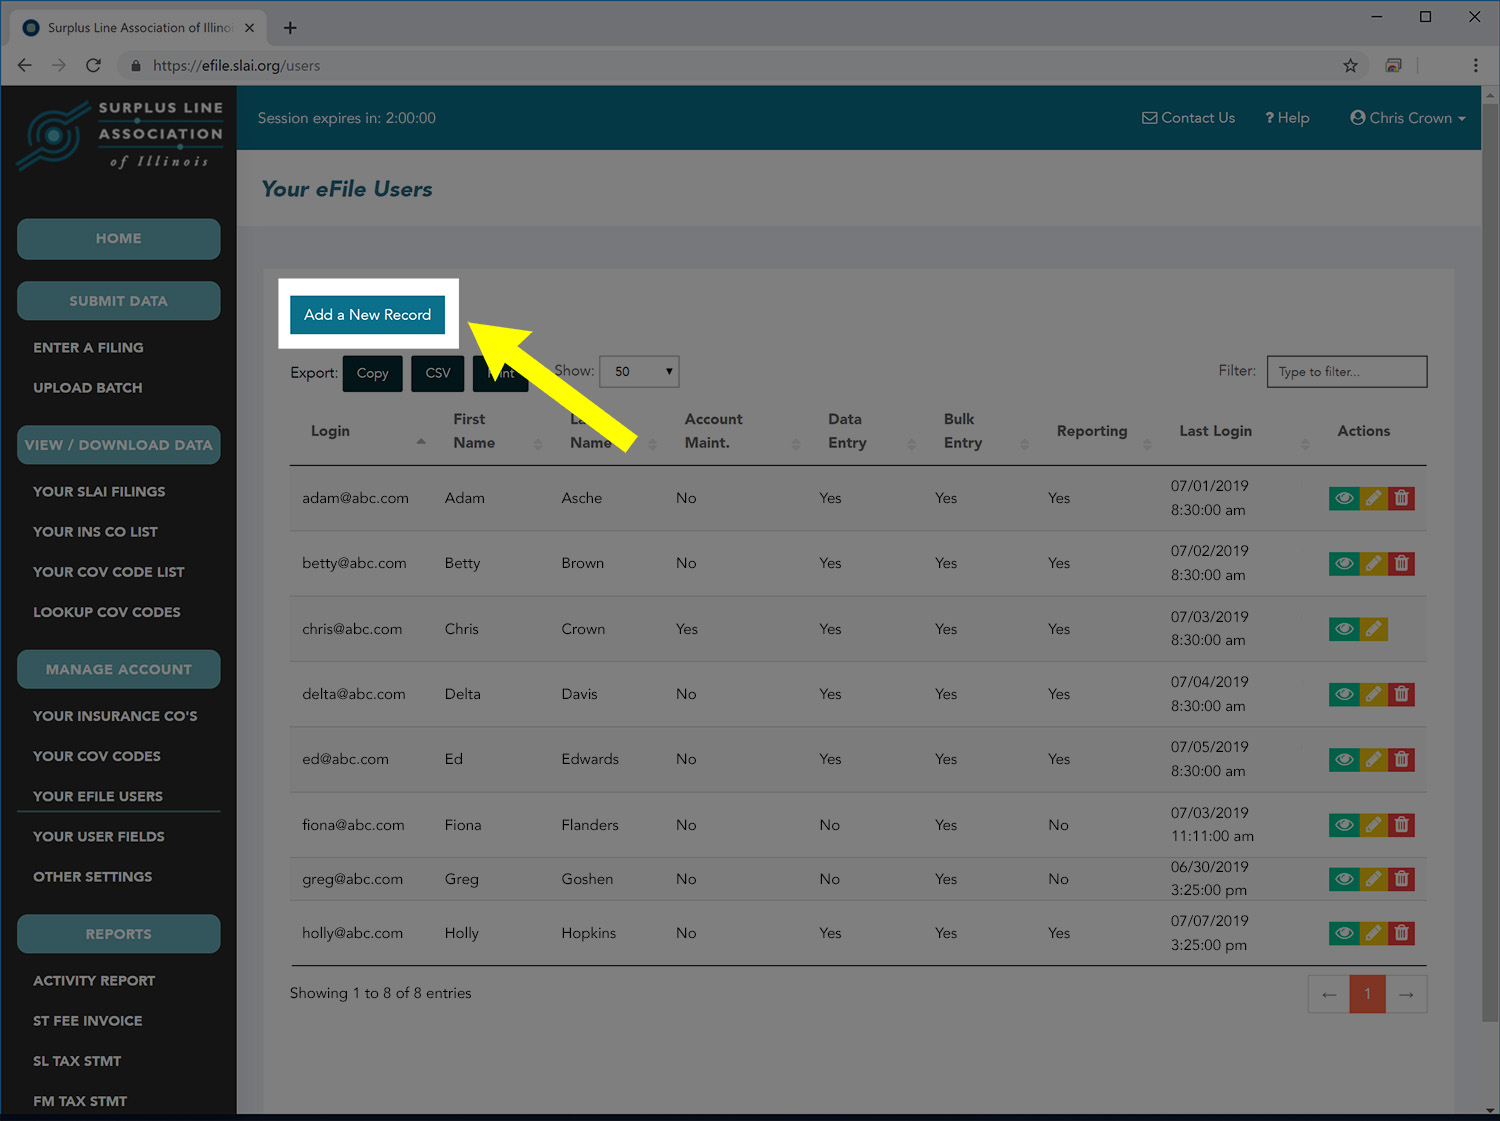
Fill in the new user’s information. For help on any field, click the “i” icon to the right of the field. Grant permissions as necessary and appropriate to the new user’s role. When you are done, click the Submit button.
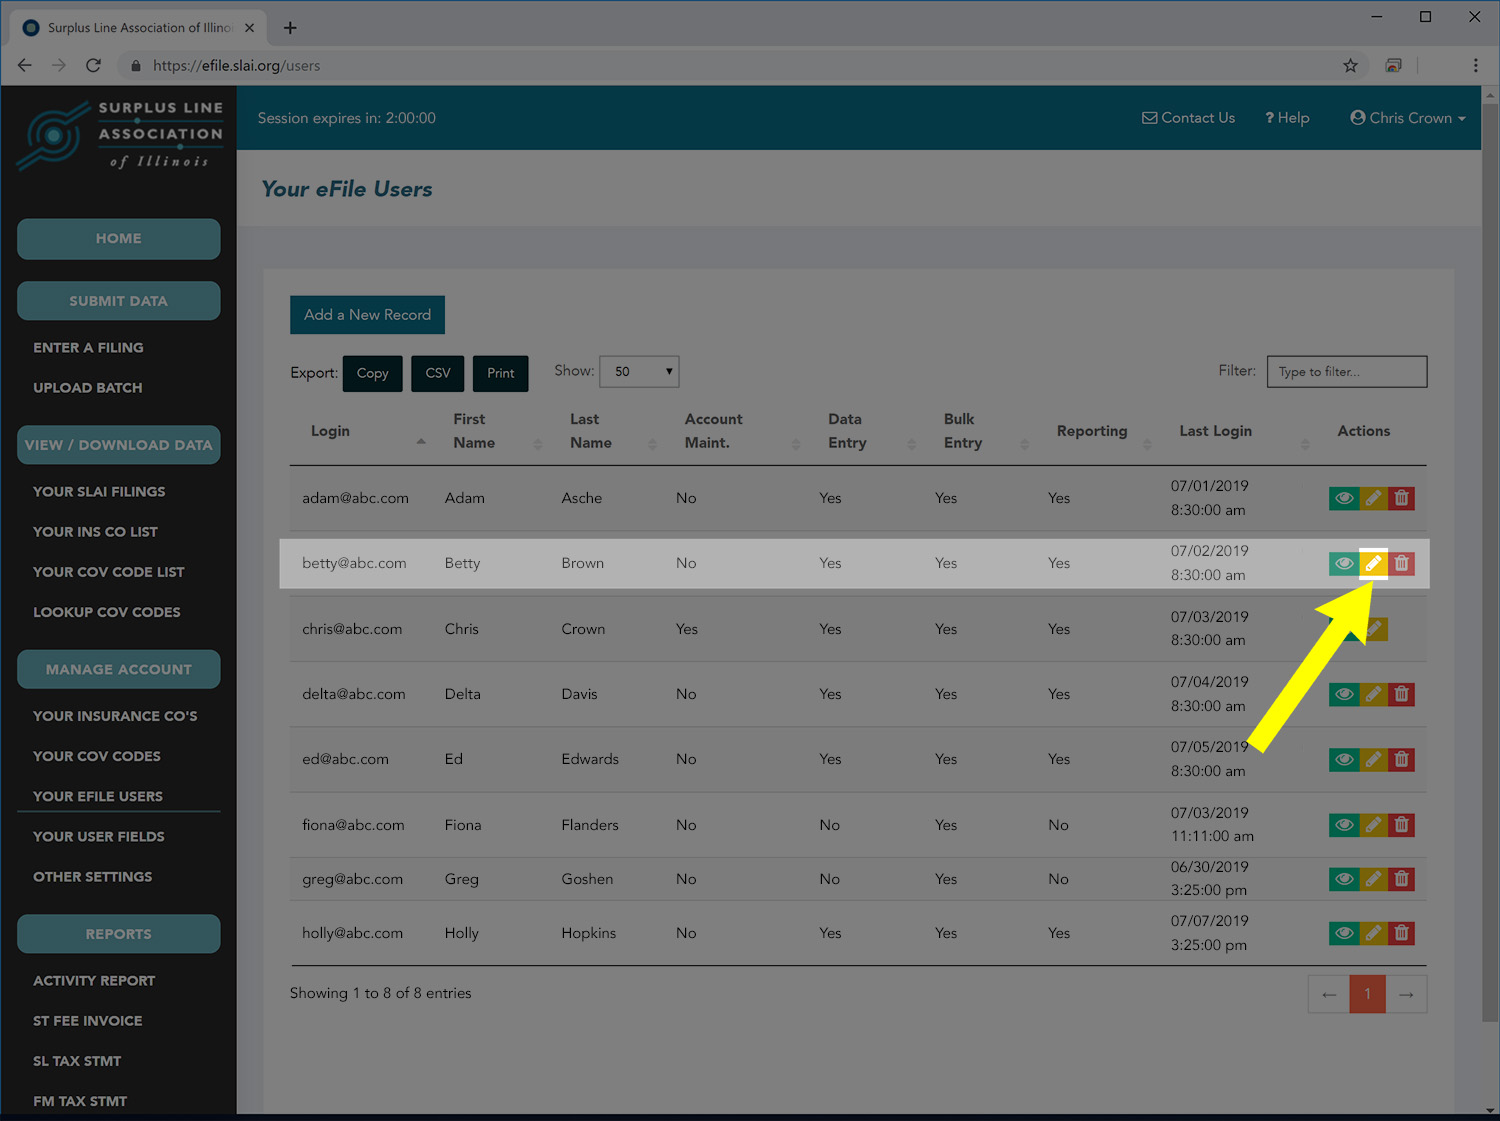
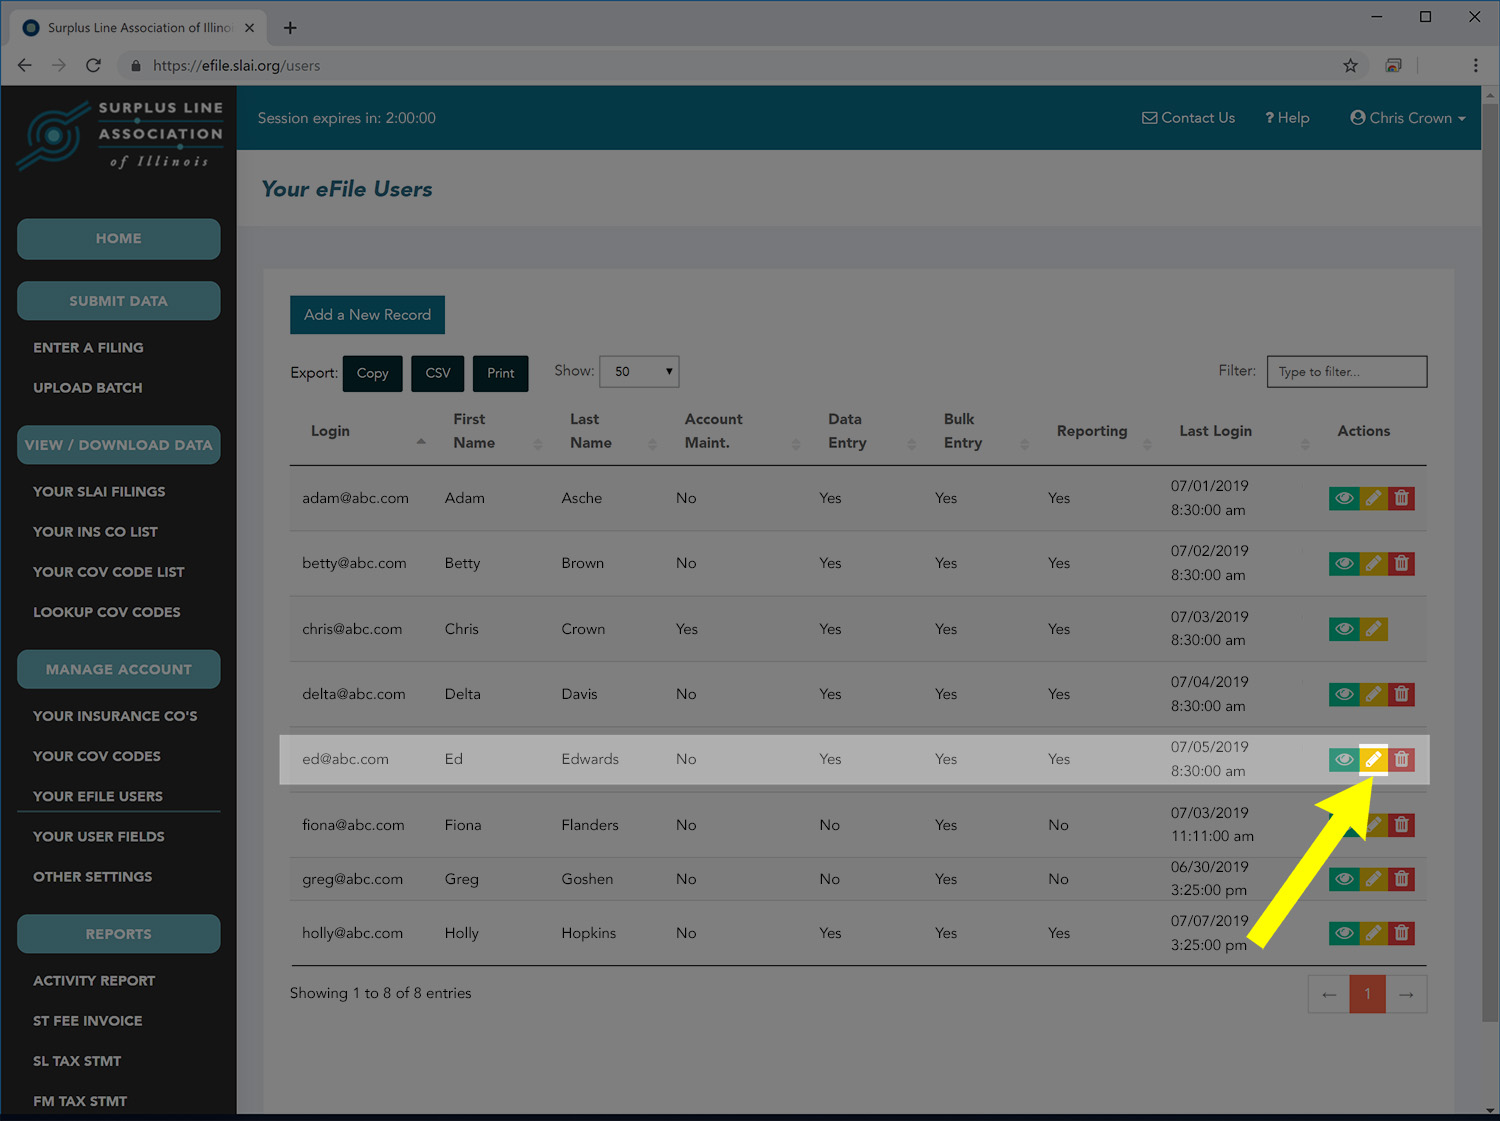
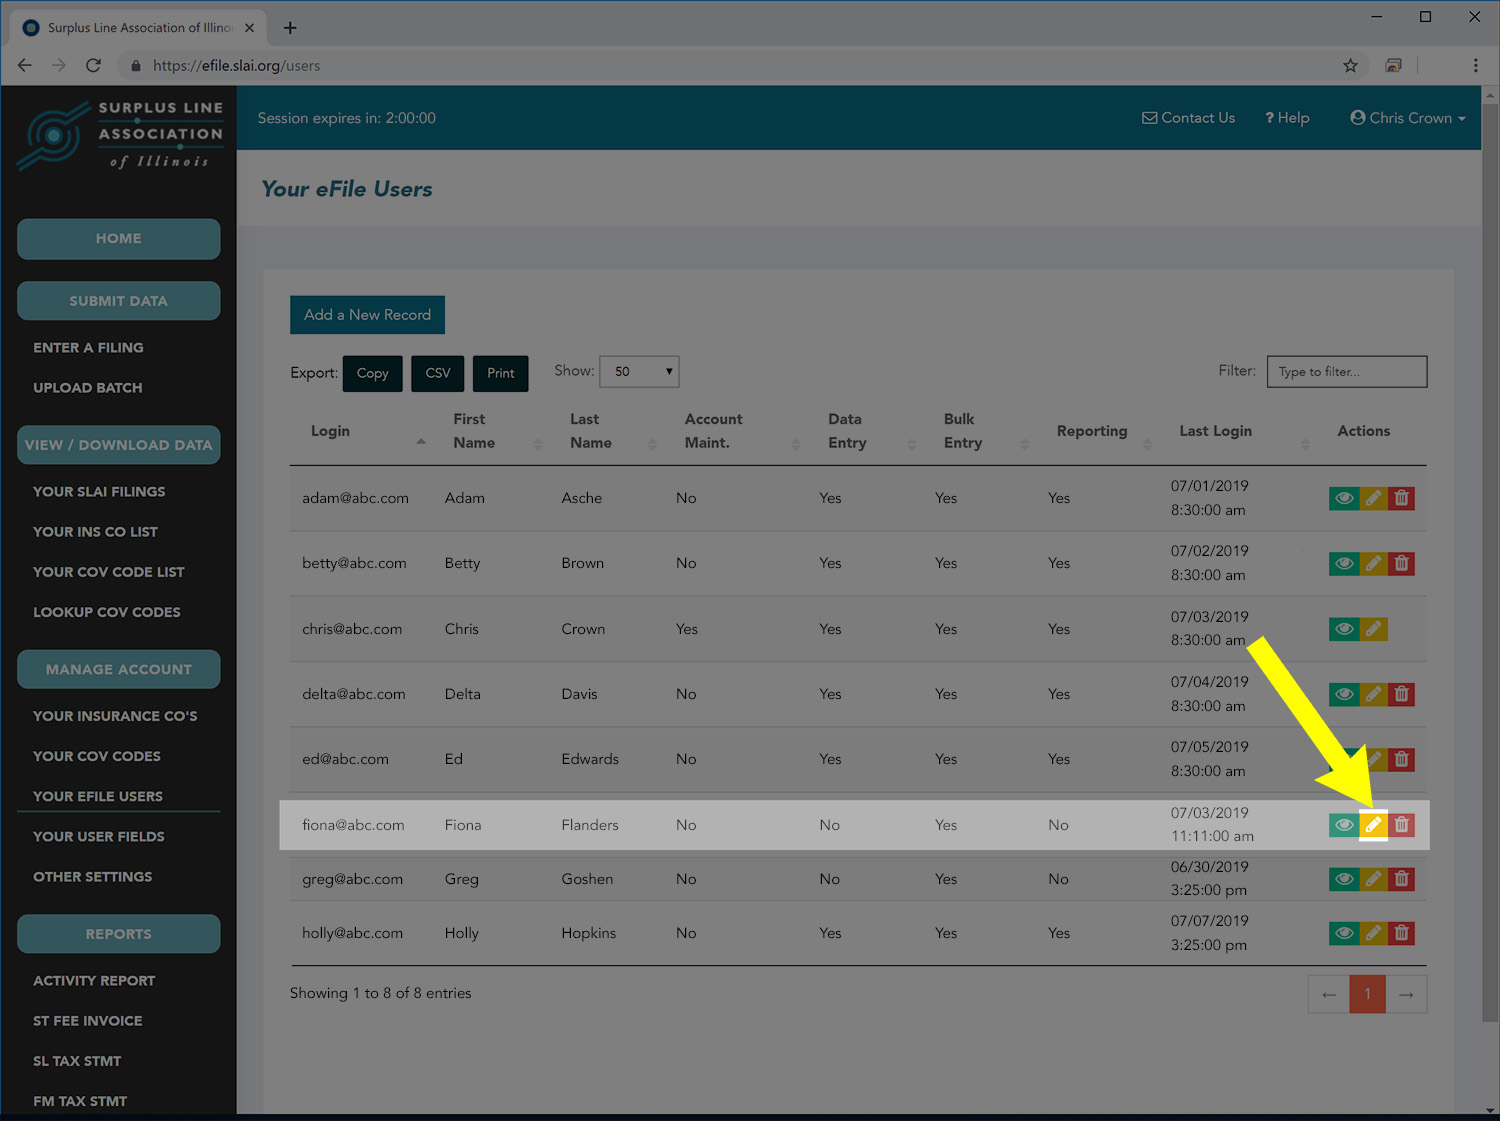
To modify a user’s settings, password or permissions, first bring up your list of users by clicking on Your eFile Users in the the Manage Account section of the menu along the left side of the screen. Locate the user you want to modify. To help you locate the user, you can type any part of the user’s login or any part of their first or last name in the filter box in the upper right portion of the screen. Once you have located the user, click on the edit icon for that user, as shown below.
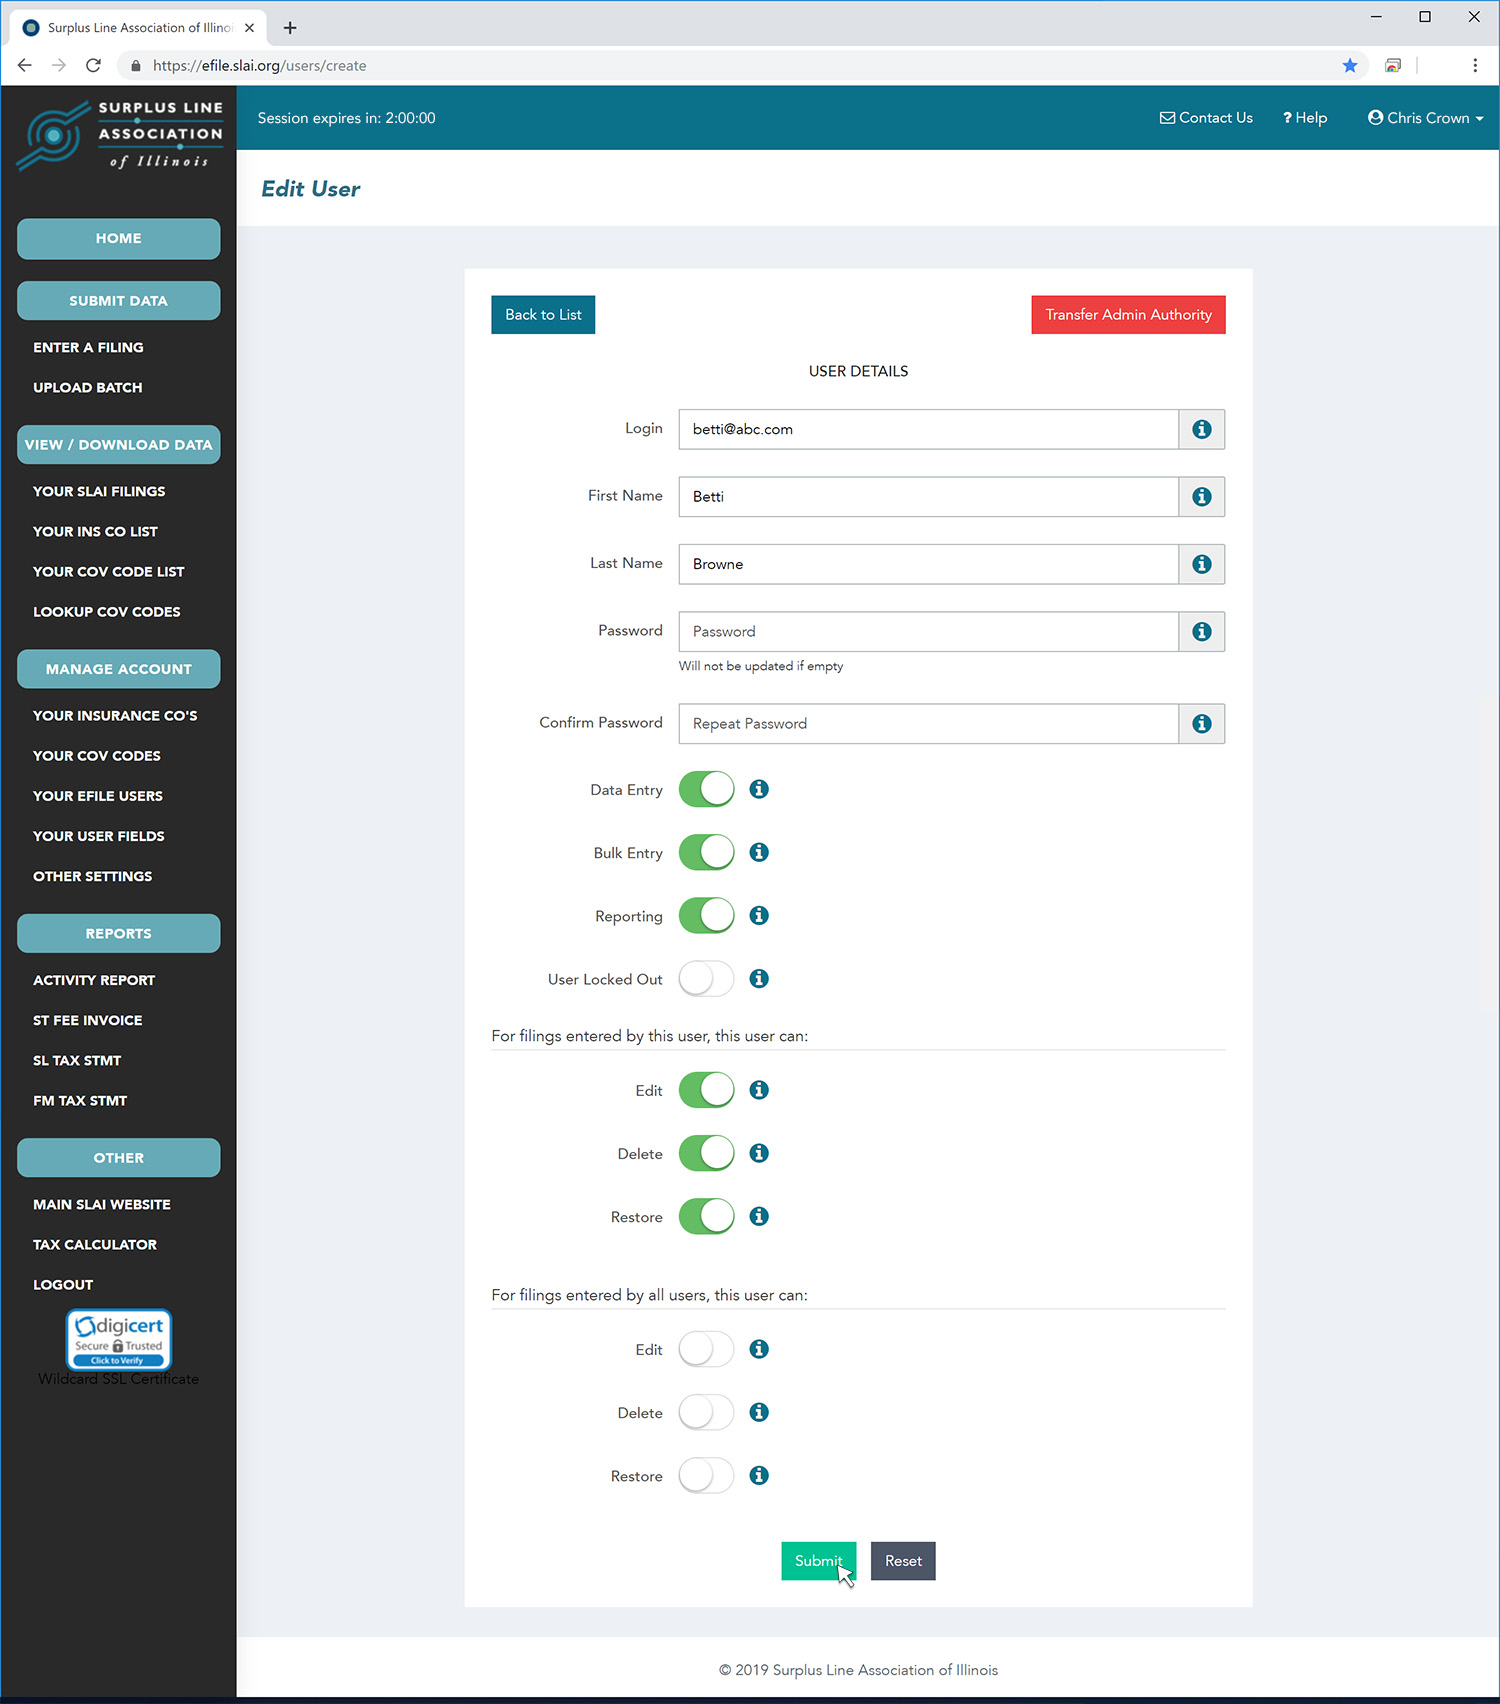
Now change the user’s information as appropriate. You can change any of the user’s data, including the login, name fields and password. If you leave the password field blank, the password will not be changed. When you are done making the changes, click the Submit button at the botton of the page.
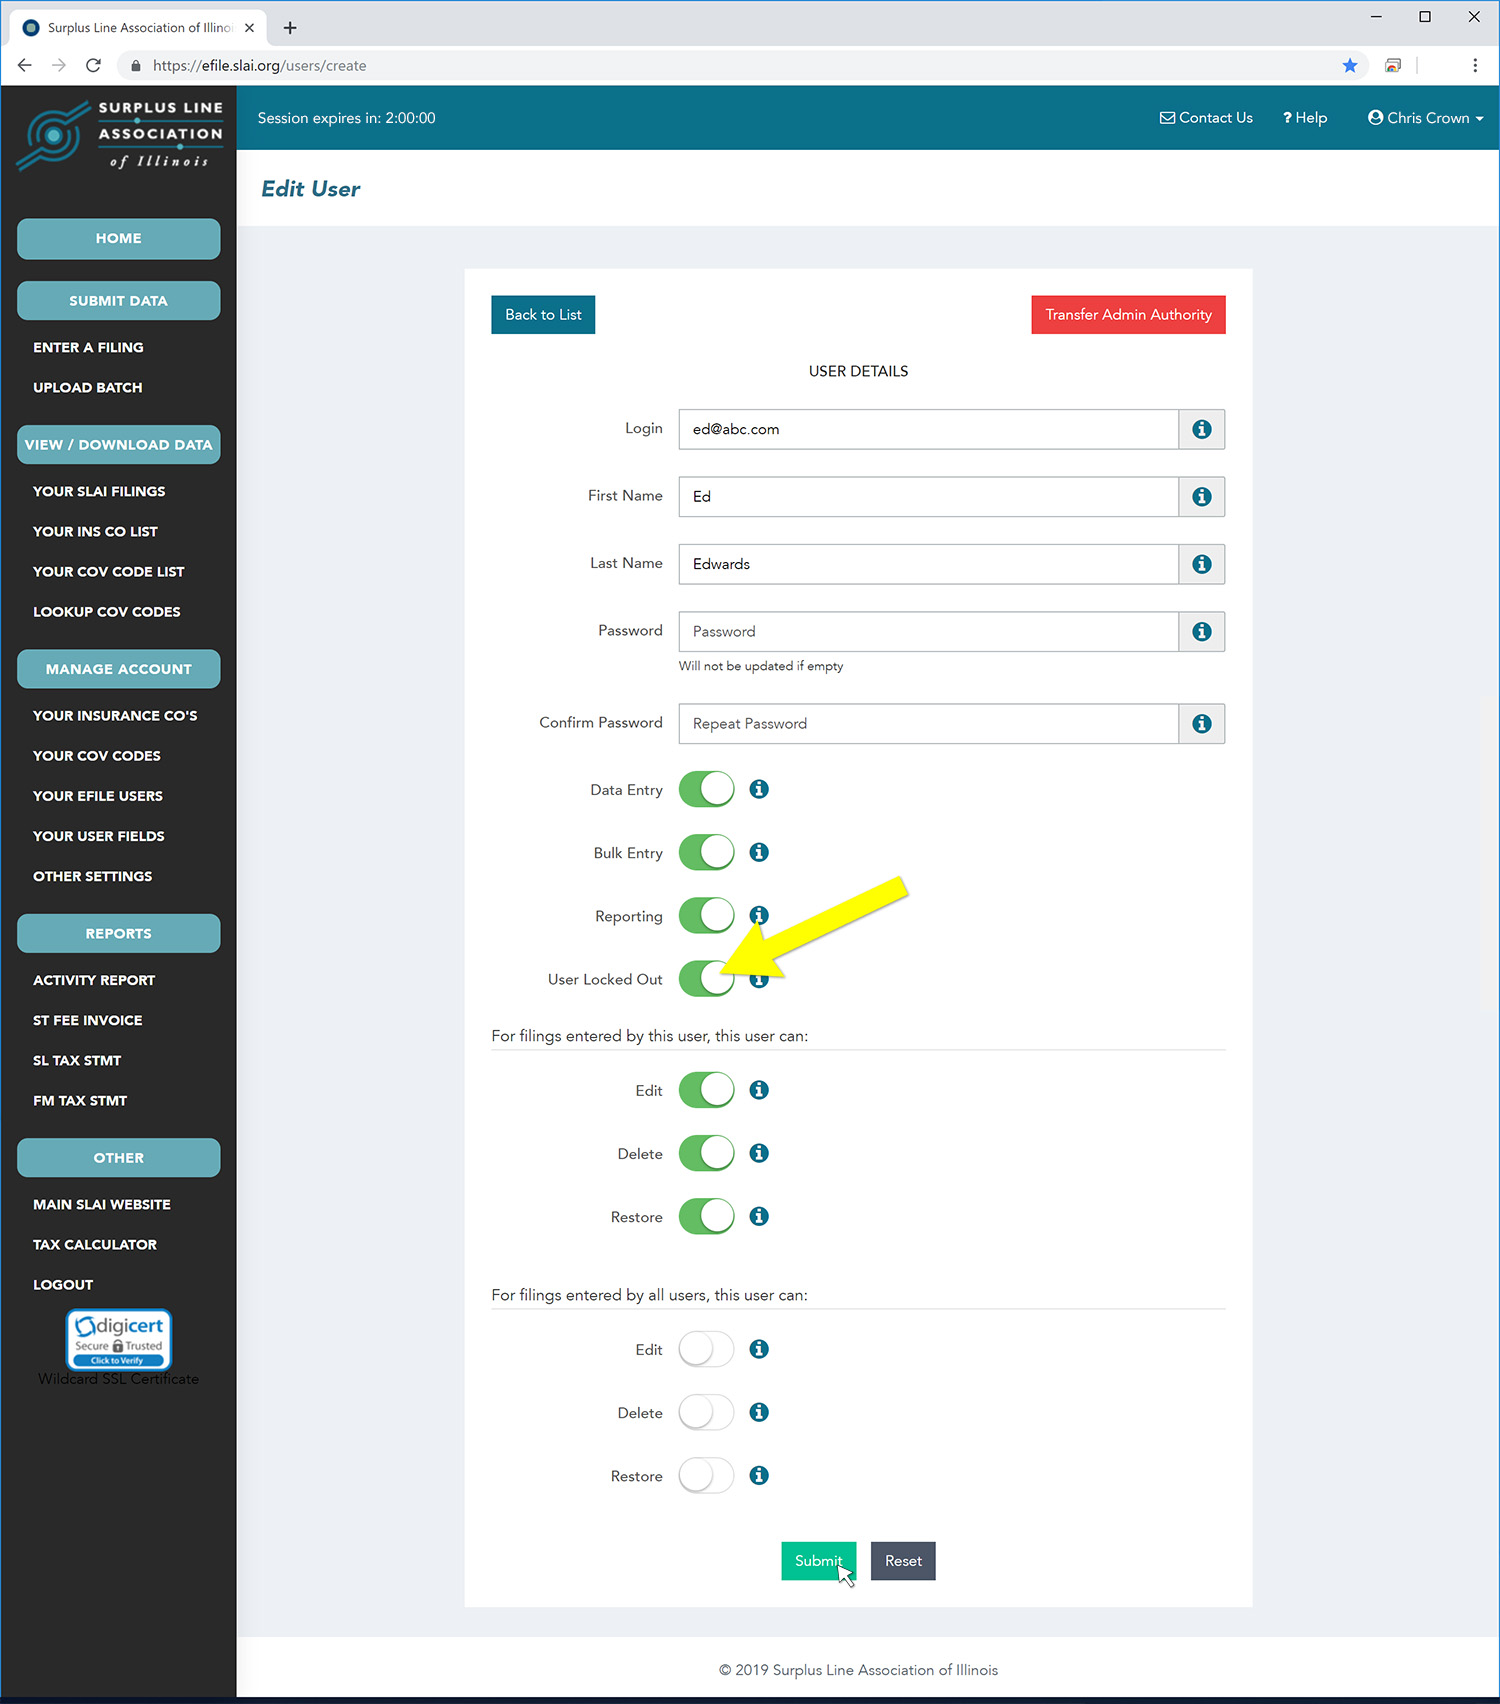
In some cases, you might want to disable a user login. For example, if a user is taking a leave. In this case, you can use the User Lockout capability.
To lock or unlock a user login, first bring up your list of users by clicking on Your eFile Users in the the Manage Account section of the menu along the left side of the screen. Locate the user whose lock setting you want to modify. To help you locate the user, you can type any part of the user’s login or any part of their first or last name in the filter box in the upper right portion of the screen. Once you have located the user, click on the edit icon for that user, as shown below.
Now change the user’s lockout field. When you are done making the change, click the Submit button at the botton of the page.
There are some instances where, instead of locking a user’s login so they cannot access the EFS, it makes more sense to delete the login altogether. For instance, if a user has permanently left the company.
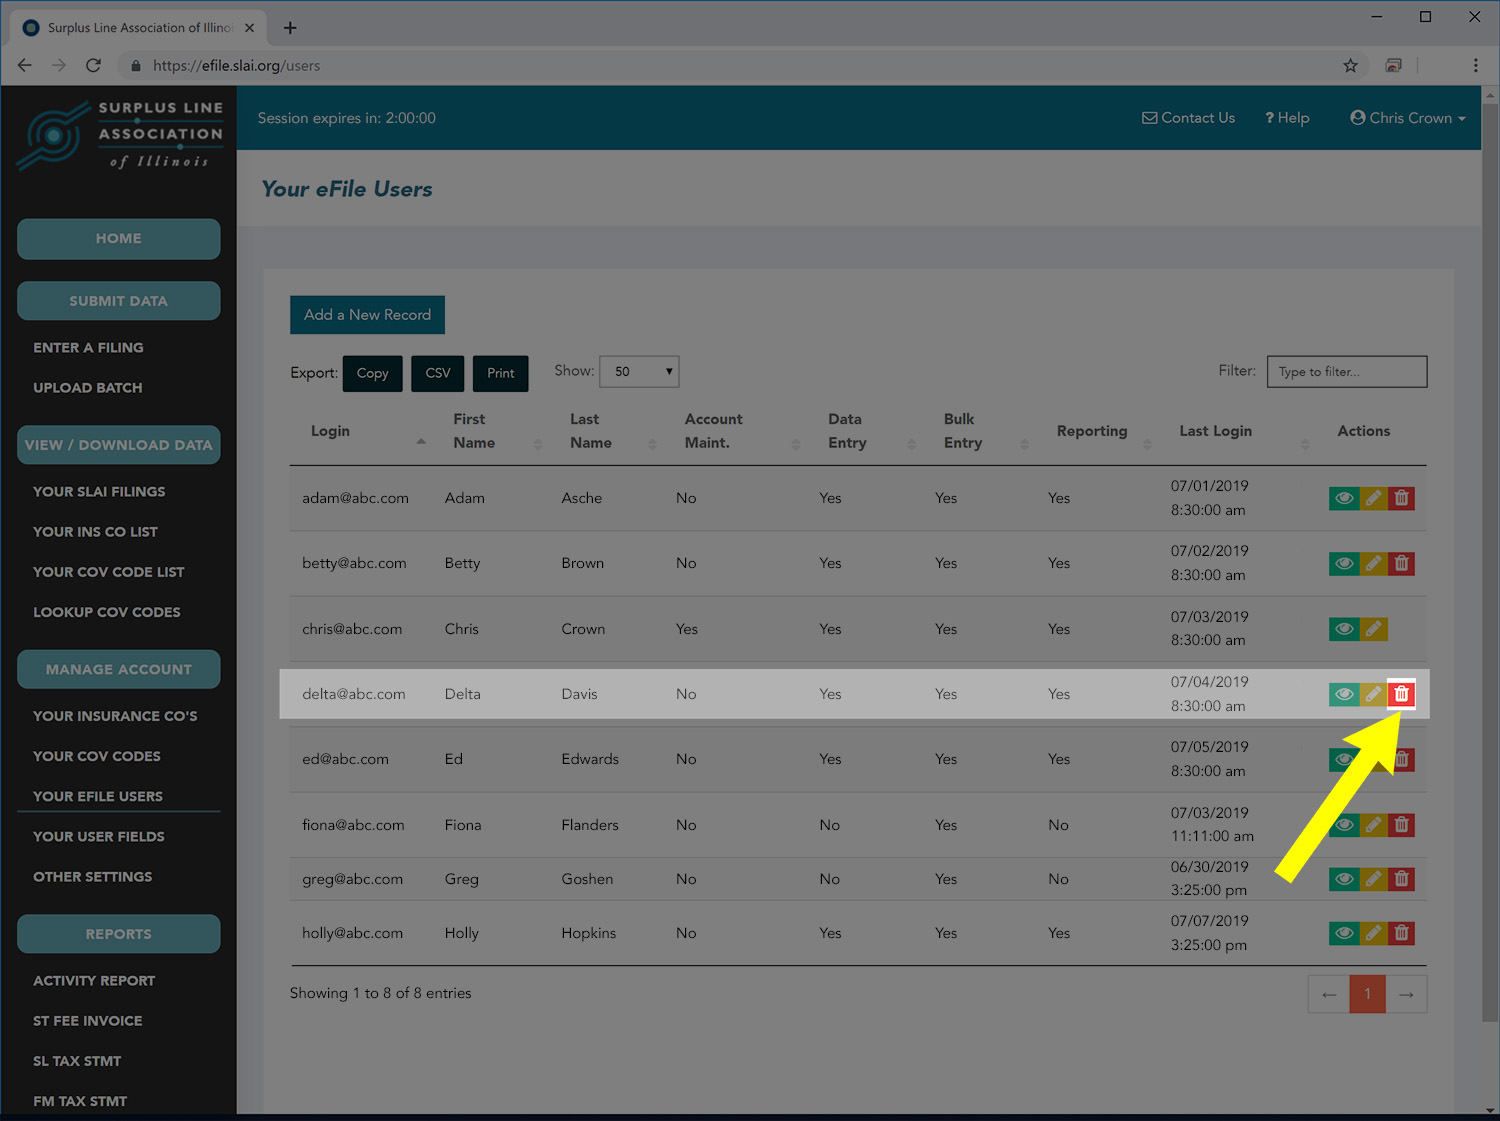
To permanently delete a user’s login, first bring up your list of users by clicking on Your eFile Users in the the Manage Account section of the menu along the left side of the screen. Locate the user to whom you wish to transfer the authority. To help you locate the user, you can type any part of the user’s login or any part of their first or last name in the filter box in the upper right portion of the screen. Once you have located the user, click on the red delete icon for that user, as shown below.
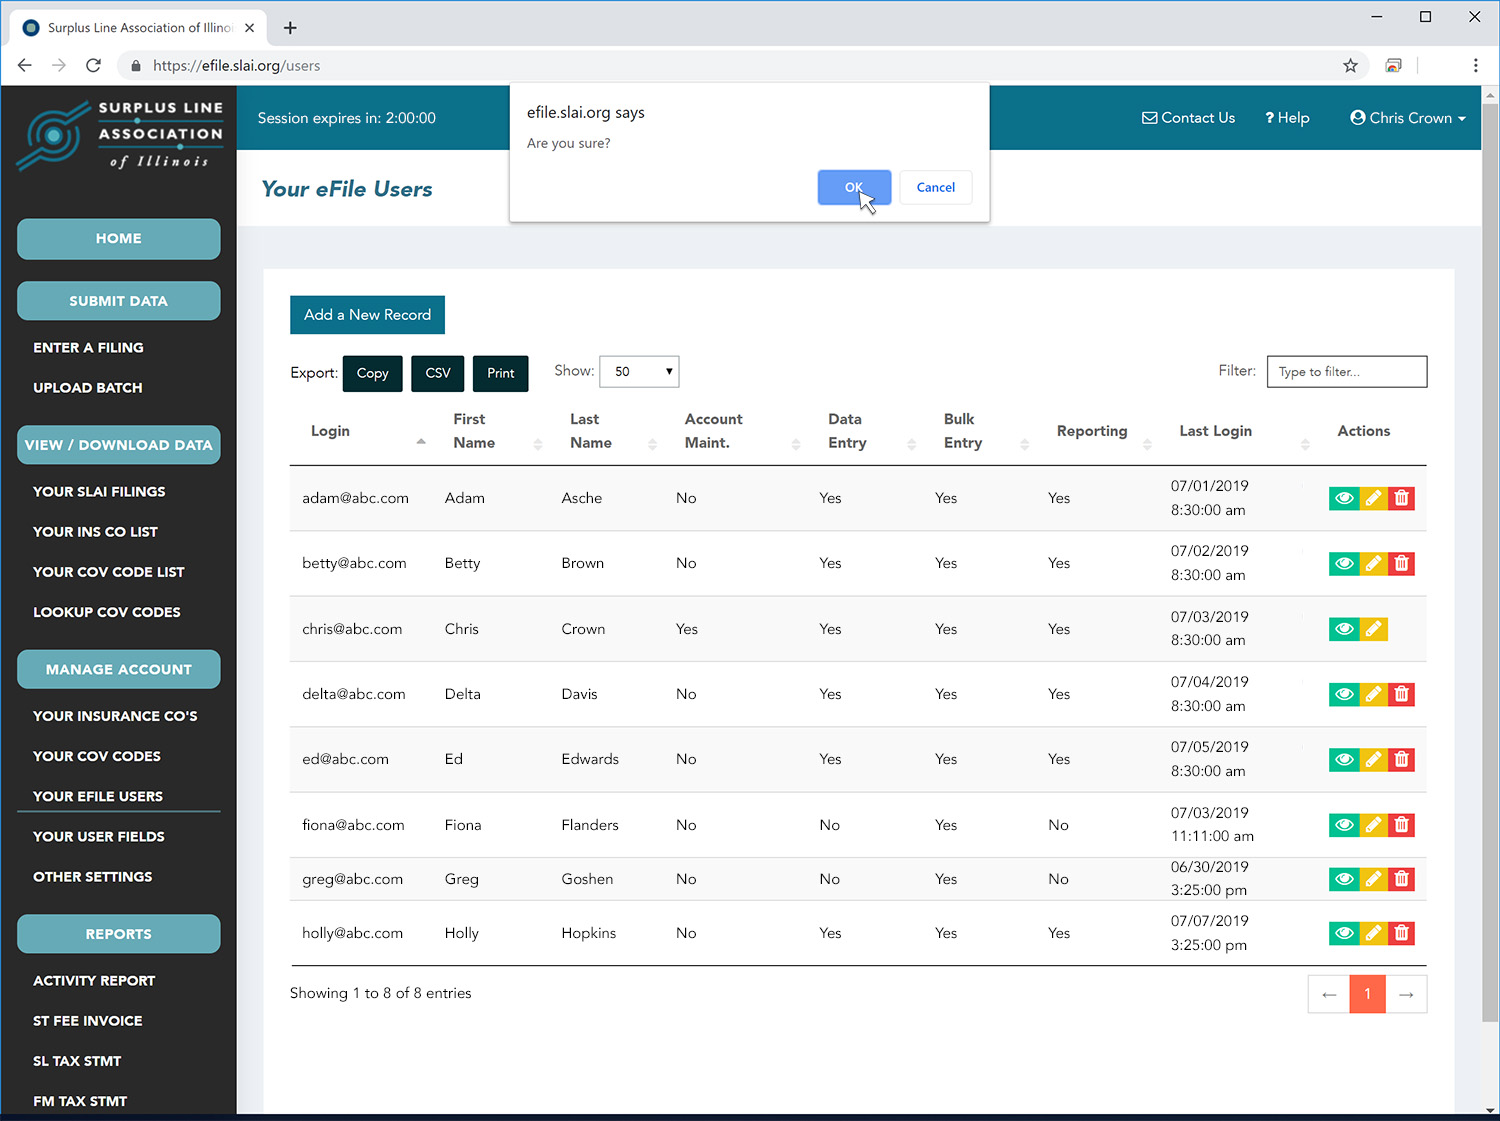
The page will present a confirmation pop-up. Click the OK button to complete the deletion of the user login.
DO NOT make a third party your EFS Administrator. If a third party will be making filings, your internal EFS Administrator can set up logins for the third party employees to use but, for security reasons, administrative control of your account should remain within your own company.
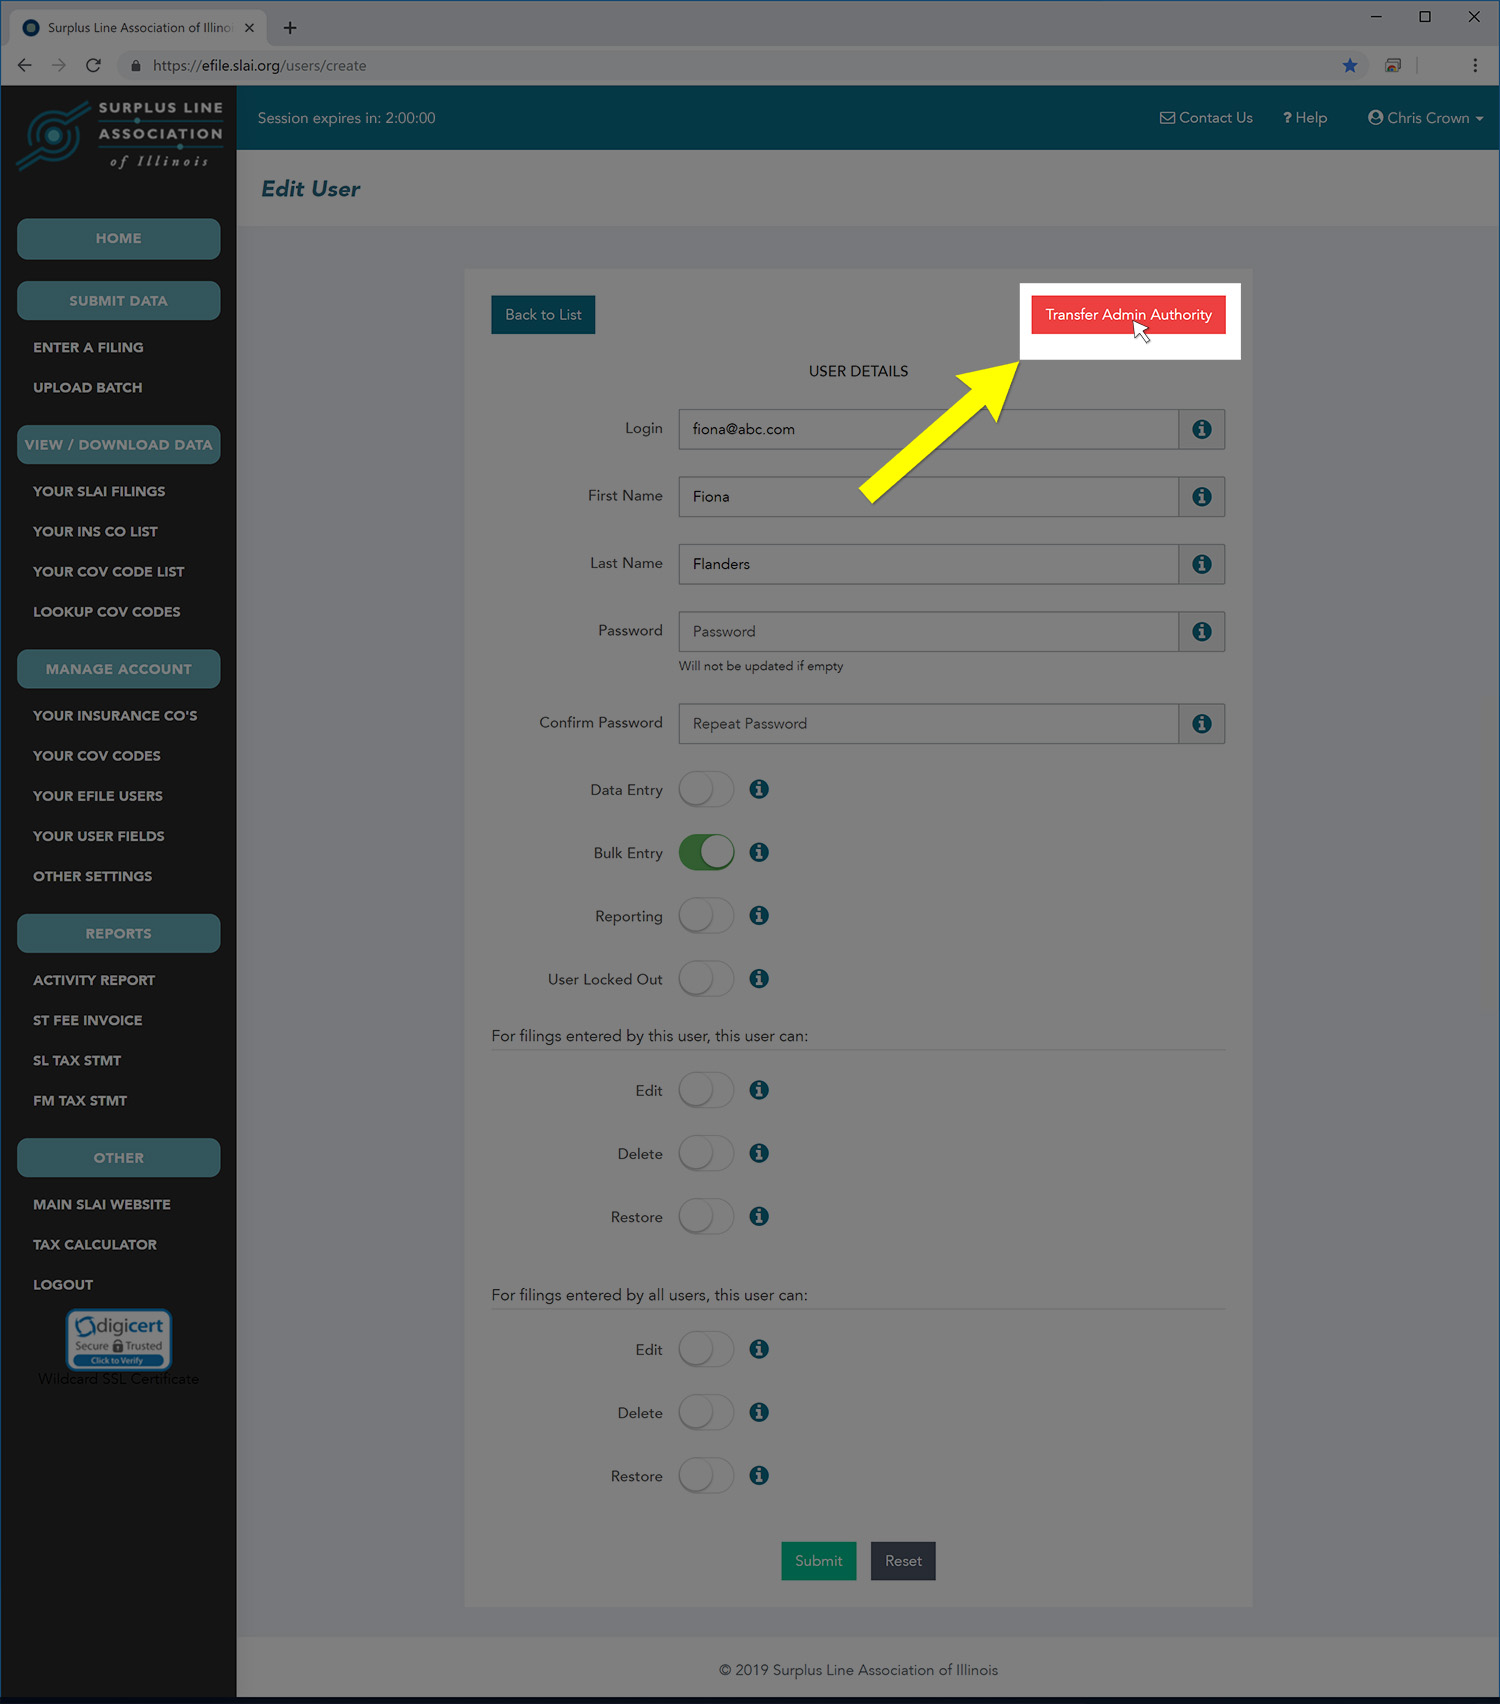
To transfer your EFS Administrator authority to a different user, first bring up your list of users by clicking on Your eFile Users in the the Manage Account section of the menu along the left side of the screen. Locate the user to whom you wish to transfer the authority. To help you locate the user, you can type any part of the user’s login or any part of their first or last name in the filter box in the upper right portion of the screen. Once you have located the user, click on the edit icon for that user, as shown below.
Now click on the red Transfer Admin Authority button in the upper right portion of the screen, as shown below.
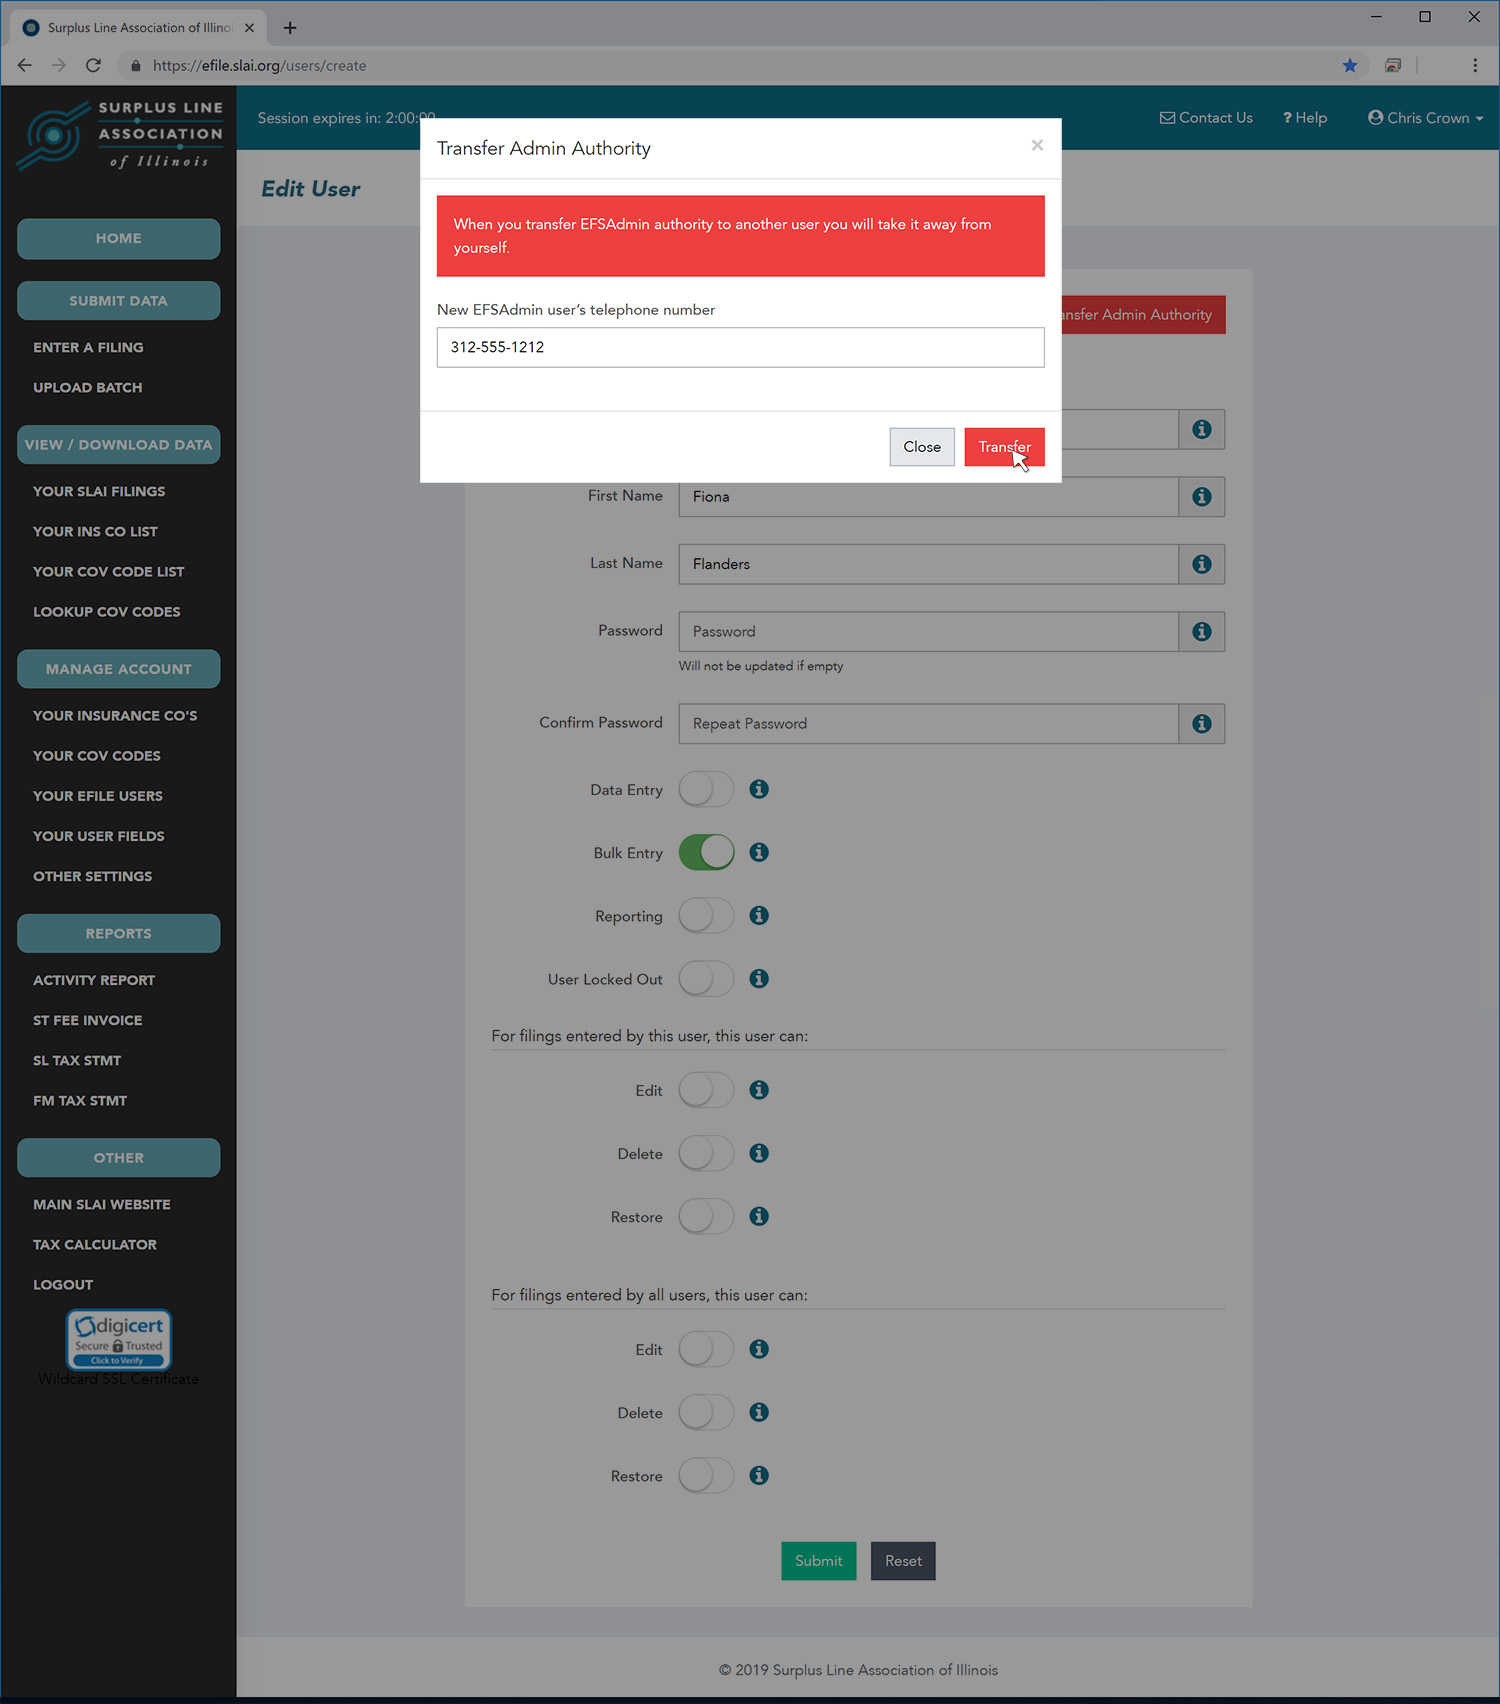
The Transfer Admin Authority popup box will appear. You must enter the telephone number of the user to whom you are transferring the authority. Then click the red Transfer button as shown below.
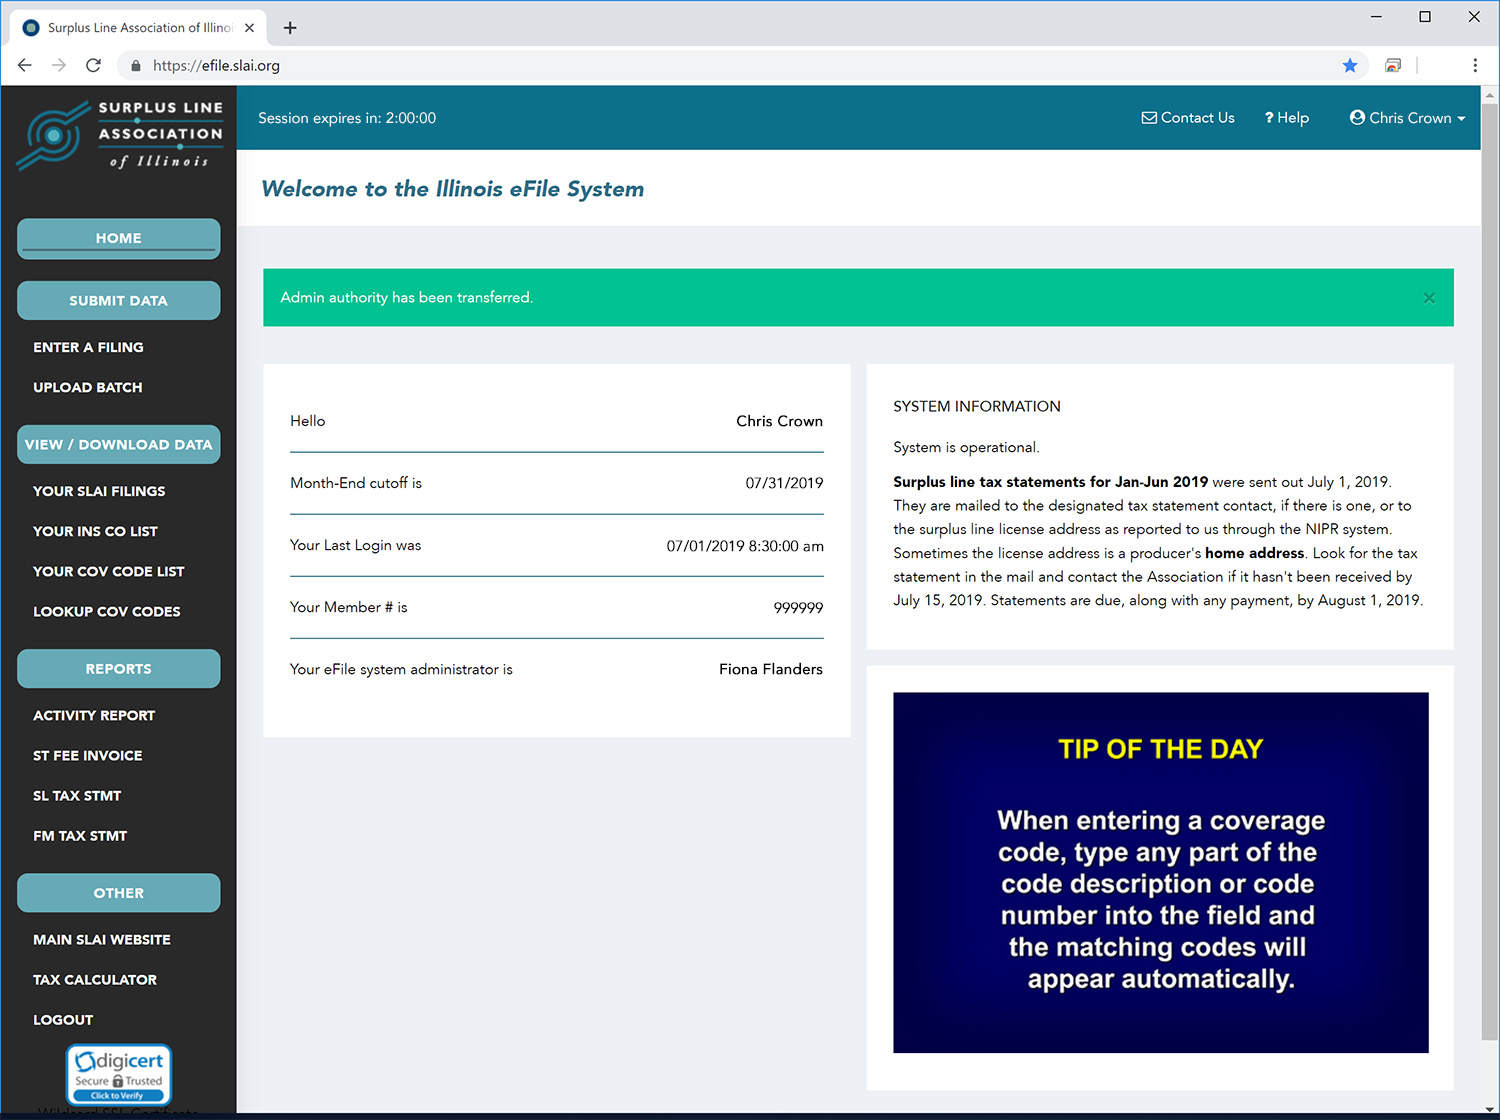
You will then be redirected to the home screen. Since you are no longer the EFS Administrator, the Manage Account section of the menu on the left side of the screen will no longer be available to you. There will be a confirmation of the authority transfer in green near the top of the screen as shown below.
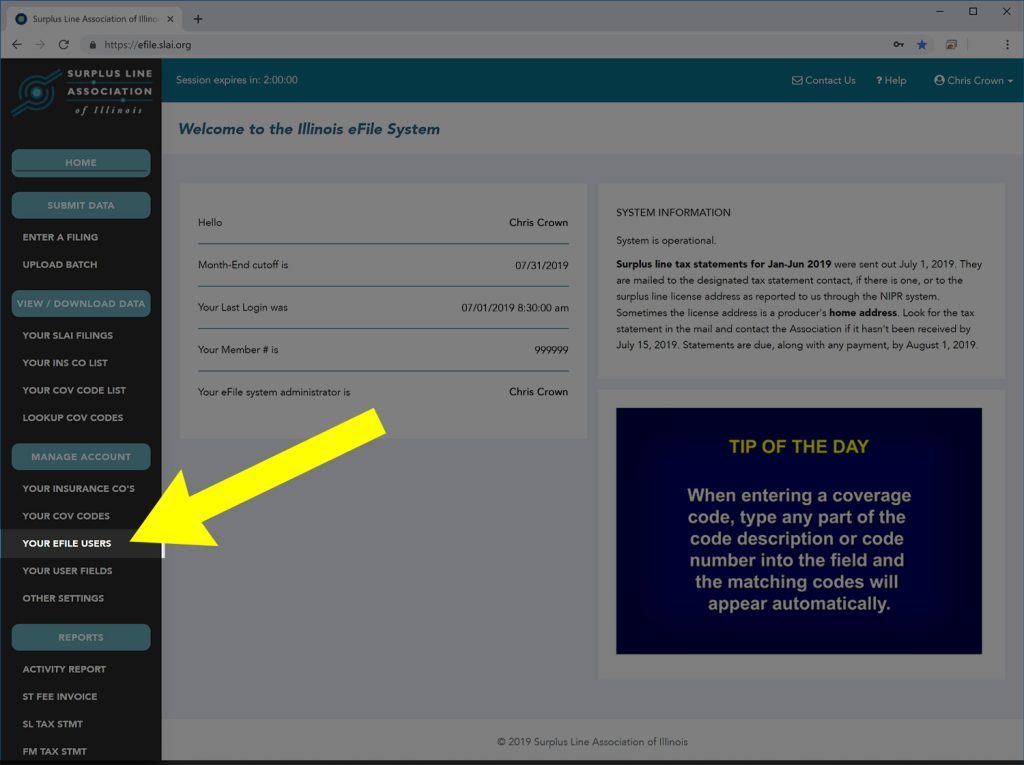
To access these capabilities on the EFS, click on Your eFile Users link, or other links, as appropriate, in the the Manage Account section of the menu along the left side of the screen as shown below. If you don’t see the Manage Account section of the menu, it means you are not the designated EFS Administrator for your membership. Contact your EFS Administrator (shown on your home screen) to perform these tasks.
ADDITIONAL SEARCH TERMS:
CLICK ON A TAG BELOW TO SEE ALL DOCUMENTS WITH THAT TAG: